PAST EVENTS
Image Description Guide
1. Overview
This document provides guidance about using image descriptions in health research. It has information about the purpose of image descriptions, general best practices for writing and presenting image descriptions, and way to build capacity for creating and using image descriptions in your organization. It also gives detailed advice on how to write image descriptions for different types of images that are used frequently in health research. Finally, it has links to other resources with helpful information.
2. Introduction
This section gives background information about what image descriptions are and how they are supposed to work.
Image descriptions are a type of access support for people who are unable to see or understand visual content. They can be thought of as a text-based translation of the information that an image is supposed to communicate.
People with many different kinds of disabilities may benefit from image descriptions, including blind people, people with low vision, people with dysgraphia, and autistic people.
There are many different ways of writing image descriptions. They can be short or long, poetic or matter-of-fact. The best approach for writing an image description depends on the image itself and the context in which it is used.
The goal of image description is to approximate the experience that people are expected to have when they look at the image. This makes image description complex because people who look at images do not always understand them the same way. The most important question to keep in mind when writing an image description is: what is this image doing here?
| Key Takeaway: When writing an image description, start by asking yourself, “What is this image for?” |
A basic goal of accessibility is to create an “equivalent experience.” This means that a user who has specific access needs will have the same kind of experience as anyone else. The first step of creating an equivalent experience is to think about what the essential features of baseline experience are.
Deciding what features are important can involve asking what users are meant to take away from the experience. Things users might take away from an experience might include:
- Information
- Emotions
- Ideas
- Questions
Once you have identified the important features of the baseline experience, you can think about how to translate those features into different formats for users with specific access needs.
| Key Takeaway: When translating an image into text, it can help to think about what kind of experience someone is expected to have from looking at the image.Are they supposed to get information, feel something, think about an idea or ask questions? |
Alt text is a way of adding image descriptions to digital content like websites, pdfs and slide decks. Most of the time, alt text does not show up visually. Instead, it is part of the markup of a file, which gets read and interpreted by computer programs. Alt text is usually read by screen readers, a type of assistive technology used by some people with vision-relatd disabilities. Screen readers turn alt text into computer-generated speech.
Alt text is the most common kind of image description used to make digital content accessible. It is so common that it is often used as a synonym for image description. However, it is important to remember that there are other ways to make image descriptions available to people, for example by including them in the body text of a document or webpage. Just like writing image descriptions, the best way to present an image description depends on the context and purpose for which the image is being used.
3. Best Practices
This section gives general information about how to think about writing image descriptions and integrating them into digital documents.
3.1 Should this image be described?
Although most images should be shown with a text or audio description, there are a few exceptions. Images and other visual elements that are “purely decorative” should not be described. When a visual element is purely decorative, its only significance is how it changes the visual appearance of a document. Therefore, describing it to someone who does not interact with the document visually does not add anything to their experience; if anything, it centers a visual perspective and risks creating an overwhelming experience for the non-visual user.
If an image contributes information to the document, it is not purely decorative and it should be described. However, deciding whether an image contributes information to a document is a judgment call.
Sometimes, it is obvious that an image adds information, such as when it helps explain or clarify the text-based content near it. Graphs, charts, illustrations and journalistic photographs are common examples of this type of usage. So are text-based images, which are frequently used on event pages and social media posts.
Other images add information in ways that are less explicit. For example, header images used on webpages are typically considered purely decorative because they function mainly to make the page look more appealing to visual users. However, an organization might make a deliberate choice to use diverse imagery of people in the header images across their website, in order to communicate that they value equity and inclusion. In a case like this, the header images do convey information, albeit implicitly, and they need to be described so that non-visual users have access to the same information about how the organization is representing diversity on their website.
| Key Takeaway: Images that don’t add important information should not receive image descriptions. |
3.1.1 How do you decide if an image adds information?
As mentioned above, the most important question when making accessibility decisions about an image is, “what is this image doing here?”
To decide if an image is decorative or not, you should think about the important aspects of how the user is meant to experience the webpage or document. Next, you should think about whether and how the image contributes to those aspects, both explicitly and implicitly.
| Key Takeaway: Important information isn’t always explicit—sometimes it is implied. |
3.1.2 How do we make decorative images accessible?
If you are creating a website or digital document and you have decided that an image is decorative, there are other steps you need to take to make sure it is accessible.
For visual users, digital files such as webpages and pdfs are interpreted by computer programs that combine the content of the document–such as text, images, and interactive elements like links and buttons–with information about how that content should be visually presented.
For some non-visual users, these digital files are instead interpreted by computer programs called screen readers, which combine the content of the document with information about how parts of the content relate to each other logically, and what order they should be read in.
When an image is included in a digital document, screen readers need to be given information about how to read it correctly. In the case of decorative images, they need to be marked as decorative.
For some kinds of digital documents, images can be marked as decorative in the word processing or publishing software that is used to edit them. For websites, images can be marked as decorative by adding an alt tag to the image element in the site’s html code, and by setting that alt tag to null or empty, as shown below (Figure 1).

Figure 1. Decorative image from the CIHR IMHA website, shown side by side with the website's code. The HTML element corresponding to the image is selected and the element's empty alt tag has been underlined. This is how you let screen readers know not to announce a decorative image.
Appendix 1 has details on how to add image descriptions in several common word processing and publishing programs.
| Key Takeaway: Decorative images need to be marked as decorative within the program you are using, so that screen readers will know to ignore it. |
The rule of thumb for describing an image is to be as concise as possible without omitting any detail that is essential to understanding the image.
This raises two questions:
- What does this image mean?
- What details are essential to communicating this meaning?
Once again, these are both judgment calls with no single right answer. The meaning of an image depends on how it is being used, which bring us back to the question, “what is this image doing here?”
Different types of images do different things. A product image on a retail website makes the product more tangible and appealing to a potential buyer. It may also give information that hasn’t been included in the product description, such as the shape of the knobs on a set of drawers, or the ornamentation on a picture frame.
A reaction GIF on social media expresses a feeling that the person posting it is experiencing. It can also create a feeling of kinship or community, through shared recognition of the feeling portrayed by the image, through shared affinity for the aesthetics of the image and its original source, or through the ‘meta’ recognition of shared participation in a particular online culture.
| Key Takeaway: What makes a good image description depends as much on how and where the image is being used, as what’s in the image itself. |
3.2.1 What do images do in health research?
The usage of images in health research contexts is generally straightforward, with minimal subtext, symbolism or other implicit meaning. Therefore, descriptions of these images should usually focus on the literal content of the images. Sometimes, it is also necessary to emphasize or interpret parts of the image to explain how they relate to other information that is being talked about. For example, when including a figure in a scientific paper or poster to illustrate a phenomenon, parts of the image that are relevant to the phenomenon should be described in more detail.
Some common types of images used in health research contexts are:
- Images from experiments
- Graphs and diagrams
- Headshots of conference speakers or lab members
- Group photos from conferences
- Logos
Appendix 2 gives information on how to describe each of these types of images.
As discussed above, the terms “alt text” and “image description” are often used interchangeably, but it is important to understand how they are different. Alt text is one way of sharing image descriptions. It makes descriptions of digital images available to screen reader users and hides them from everyone else[1]. This can make sense for some ways of using images. But screen reader users are not the only people who may need an image to be described in order to have an equivalent experience.
Other people who may benefit from image descriptions include:
- People who have trouble making sense of numbers, charts or diagrams (e.g., people with dyscalculia or dyslexia)
- People for whom complex images are cognitively overwhelming (e.g., people with traumatic brain injury, people with brain fog)
- People who have episodic difficulties with seeing or visual processing (e.g., people with migraine aura)
- People who have difficulty interpreting meaning (e.g., autistic people, people with intellectual disabilities)
| Key Takeaway: Sharing image descriptions in the body of the document can make the images more accessible for people who don’t use screen readers. |
3.3.1 When should an image description be shared visually?
In physical space, it is a good idea to always make an image description visually available in case someone needs it. Because of how we interact with images in visual space, giving a providing an image description visually doesn’t introduce any problems for people who need to access image descriptions in a different way.
With digital images, we can share image descriptions visually by including them in the body of a document. However, doing this creates redundancy with alt text. It also interrupts the flow of the document’s main text, which can be confusing and overwhelming for some users. Sharing image descriptions visually will improve the experience of some disabled users[2], while worsening the experience of screen reader users. This is an example of an access conflict.
3.3.2 Dealing with access conflicts
When something is designed or implemented in a way that meets someone’s access needs, it is called an access support. When something is made in such a way that it doesn’t meet someone’s access needs, it is called an access barrier. Sometimes, something that works as an access support for one person can be an access barrier for someone else. When this happens, it is called an access conflict[3].
It is always best to design and implement things to make sure they meet everyone’s access needs, but sometimes this is not possible. When this happens, you will need to make choices about which access needs to prioritize.
Some questions you can ask to help guide these choices are:
- How will it impact people if these access needs are not met?
- Are there other ways to meet these access needs that don’t introduce an access conflict?
- How easy is it for people to get these access needs met elsewhere?
- What design choices can you make that will let you meet these access needs while limiting the barrier that is created for others?
Overall, the goal is to ensure as many people as possible have an experience that is as close to equivalent as possible, while preventing any harmful experiences.
| Key Takeaway: An access conflict is when something that supports one type of access need also creates a barrier for a different type of access need. Dealing with an access conflict requires making choices about how to create the best experience for the most people, while preventing harmful experiences. |
3.3.3 What do screen reader users experience when you share an image description in the body of a document?
When an image description is shared visually, as part of the body of a document, it will be read by a screen reader along with the rest of the document’s text. As discussed above, this creates redundancy with the function of alt text, which can cause an access conflict. There are two things we need to think about to make this experience work well for screen reader users.
- What should we do with the image element and its alt tag?
- Where should the image description go?
3.3.4 Visible image descriptions and alt text
To understand how to combine visible image descriptions and alt text, let’s examine the different ways we could approach this situation and think about how they would affect a screen reader user’s experience. Imagine we have shared the following diagram and visible image description in the body of a webpage (Figure 2).
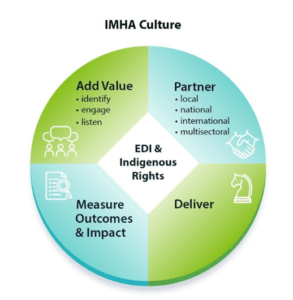
Figure 2. Diagram titled “IMHA Culture.” A circle is divided into four quadrants, describing different components of the organization’s approach to building culture.
Quadrant 1 heading. Add Value. List with 3 items. Item 1. Identify. Item 2. Engage. Item 3. Listen.
Quadrant 2 heading. Partner. List with 4 items. Item 1. Local. Item 2. National. Item 3. International. Item 4. Multisectoral.
Quadrant 3 heading. Measure Outcomes & Impact.
Quadrant 4 heading. Deliver.
A central diamond shape overlaps all four quadrants, with the heading EDI & Indigenous Rights, indicating that this principle is included in every part of IMHA’s culture building.
There are four things we could do with the alt tag for this image.
- Do nothing
- Set the image to decorative by creating a null alt tag
- Copy the existing image description to the image’s alt tag
- Create a new description to add to the image’s alt tag
If we do nothing, a screen reader will announce “image” with no further information, and then continue reading the rest of the page, including the image description. This is not an effective solution because it will leave the user wondering what the image showed. They will be uncertain whether the image description they hear later relates to that image or to something else.
If we set the image to decorative, a screen reader will not announce the image before reading the rest of the page content, including the image description. This is slightly better than leaving an untagged image, but it still creates a confusing experience. The user will not know why they are encountering an image description in the body of the page, or what it relates to.
If we copy the existing image description to the image’s alt tag, a screen reader will announce “image” followed by the image description. It will announce the same description again when it encounters it in the body of the page. This is not a good solution because it creates a redundant and overwhelming experience for the user.
If we create a new description to add to the image’s alt tag, a screen reader will announce “image,” then the new description, then the original description in the body of the page. This approach creates a landmark for screen reader users, telling them how different parts of the page relate to each other.
In the example above, the image has alt text that says, “Figure 2.” A screen reader will announce, “Image. Figure 2,” followed by the description, which begins, “Figure 2 shows…” This lets a screen reader user know that they have encountered an image element, that the element is called “Figure 2” and that the subsequent description relates to that element.
The visible image description should be placed so that it will be announced immediately after the image element. Within the body of a document, most of the time, a screen reader will announce elements in order from top to bottom and left to right[4].
| Key Takeaway: When creating a visible image description as part of a digital document, you should also write a short alt text for the image. This alt text should tell the user where and how they can find the image description. It should not duplicate the information given by the image description. |
3.3.5 Long descriptions
Long descriptions are a type of visible image description. They are used to give detailed information about complex images such as diagrams. These types of images can be hard to understand for many people. For this reason, long descriptions should be provided as visible image descriptions.
Appendix 2 has detailed advice on how to write long descriptions of images of experiments, diagrams, charts and graphs.
The following links have helpful information about how to format long descriptions within digital documents:
- Accessibility By Design: Long Description by Colorado State University (2025)
Complex Images by W3C Web Accessibility Initiative (Last updated January 2022)
[1] An exception to this is when an image is not loading as normal on a website, such as when a person’s internet connection is slow. In this case, if alt text has been provided, it will show up visually on the screen.
[2] This document uses identity-first language to talk about disability. This language is preferred by most disability activists because it recognizes that disability is a neutral part of who a person is. Many disabled people find person-first language (“person with a disability”) stigmatizing because it treats disability as something that should be de-emphasized and separated from who they are. Most public institutions still advocate for person-first language as a default, but this stance originates from advocacy done by educators and social workers who were not themselves part of the disabled community. As a result, choosing person-first language as a default reinforces the harmful paternalism that has historically been imposed on the disabled community.
[3] We usually talk about access conflicts as something that involves the access needs of different people. Sometimes, however, one person can have multiple access needs that conflict with each other. For example, someone who is autistic and hard-of-hearing may use a hearing aid that helps them hear other people but also increases their susceptibility to sensory overload.
[4] This is a simplified rule of thumb to think about when positioning body elements like images and captions in a word processing program like Microsoft Word or a content management system like WordPress. You should never assume that a screen reader will read the content of a document in the same order that you would notice them visually, and you should always manually check the document’s reading order. Appendix 1 has links to further reading about how to do this in several common programs.
4. Building processes to make and share image descriptions
If we are working with many of the same images over and over, it can be useful to make a repository where we save and organize all of them. When doing this, we can make image descriptions part of our repository.
We might use a platform where we create dedicated entries for each image and add information about where and how they should be used. If we take this approach, we can add a field for an image description. We can even create multiple fields, where we can add different versions of the description, such as a long or abridged description.
We might also store our image repository in folders. With this approach, we can create a subfolder to store each image and add a text file with the appropriate image description(s) to it.
It is important to sure that at least one person on our team is specifically responsible for making our images accessible. They will need to do the following things:
- Make sure all images that are already being used have image descriptions written for them.
- Write image descriptions for all new images.
- Send out requests for image descriptions from content contributors.
- Make sure alt text and/or visible descriptions are included when images are added to documents or shared online.
When we work with people who will be giving us images to publish, it is a good idea to ask them to provide their own image descriptions. This is because they will have the best idea of what the most important information in the image is.
Many people are not familiar with writing image descriptions, so it is importance to give them guidance to help them succeed, feel comfortable, and not get overwhelmed. Appendix 2 has detailed information about how to write different kinds of image descriptions, which may be helpful to share with contributors. Appendix 3 has a template for an invitation that can be sent to conference presenters to describe their headshots.
This section has links that give information about how to add alt text, mark and check reading order in different word processing and publishing programs.
Microsoft Office
- Add alternative text to a shape, picture, chart, SmartArt graphic, or other object by Microsoft Support
- Make slides easier to read by using the Reading Order pane by Microsoft Support
- Improve accessibility with the Accessibility Checker by Microsoft Support
Canva
- Create and edit alt text for your images and elements by Canva Help Center
- Canva accessibility features by Canva Help Center
Adobe Acrobat
- Accessibility features in PDFs by Adobe
- Reading Order tool for PDFs by Adobe
- Edit document structure with the Content and Tags panels by Adobe
- Creating accessible PDFs by Adobe
WordPress
- WordPress Image Alt Text by Erin Myers, WP Engine Resource Center
- Improve Your Site’s Accessibility by WordPress Support
Describing images of people
Describing images of people can be challenging because we need to balance two competing priorities.
- We want to provide enough information about the person or people in the picture that people who cannot see the picture will have an equivalent experience to those who can.
- We want to avoid making assumptions about people’s identities based on how they look, and to avoid describing them in ways that would cause them discomfort or harm.
For this reason, it is best to have people in pictures describe themselves whenever possible. Appendix 3 has a template for an invitation that can be sent to conference presenters to describe their headshots. The template can be adapted for people in other types of images you may use. It has guidance for how people can describe images of themselves. This guidance can also be found in the next section of this appendix.
When you don’t know how a person describes themself and you aren’t able to ask them, it is best to describe their physical attributes directly using neutral terms.
Table 1 has some examples of terms that may be useful when describing other people’s physical appearance. It also has some examples of terms that should be avoided when describing other people, because they are often disliked by the people they refer to. These examples are not exhaustive; they are meant to give a starting point for you to work from.
| Category | Descriptive Terms | Terms to Avoid | Additional Notes |
| Skin colour | Describe shade, tone, colour, patterns Colour: brown, beige, pink, red* Tone: cool, neutral, warm Shade: pale/light, medium, dark Patterns: freckles, vitiligo, birthmarks, tattoos*Some people with skin differences like ichthyosis describe their skin as red or purple |
Avoid using figurative language derived from foods, as these metaphors are used to dehumanize racialized people. | For people with pink or beige skin, opt for ‘pale’ instead of ‘light’. “Light- skinned” is a phrase used within Black communities to describe Black people with a light complexion, and may cause confusion otherwise. |
| Hair | Describe colour, type, length/size and style.
Colour: black, brown, red, blond, grey, white |
Avoid referring to locs as ‘dreadlocks’ or ‘dreads’ as this is a derogatory term. | People with coily hair who wear natural (unstraightened) styles are often discriminated against because of this.
If you are unfamiliar with natural hair styles, look them up to make sure you are describing them accurately. |
| Body size | Fat, thin, muscular, tall, short. | Avoid using medicalizing or stigmatizing terms such as ‘obese’ or ‘overweight’. Avoid euphemistic language like ‘curvy’ or ‘plus size.’
When describing images of multiple people, either describe everyone’s size or no one’s. |
Be cautious when deciding whether to describe body size. ‘Fat’ is a neutral descriptor that is preferred by fat activists and scholars.
However, for people with eating disorders or body dysmorphia, having their body size described by others may be upsetting or dangerous. |
| Gender and sex | Images without sexual anatomy: Avoid describing gender or sex unless you know how the person identifies.
Images with sexual anatomy: Describe the anatomical features directly rather than attributing them to a particular sex or gender. |
Avoid labeling gender or sex unless you know how the person identifies. | Gender refers to identity while sex is generally understood to refer to anatomy and physiology.
Both are complicated, not strictly binary, and cannot be determined with certainty just by looking at an image. Both gender diverse and intersex people can experience harm when people make incorrect assumptions about their sex or gender. |
| Assistive devices | “[device] user” or “using a [device]”
Devices: manual wheelchair, power wheelchair, rollator/walker, forearm crutches, cane, white cane (typically used by blind and low vision people), lower- or upper-limb prosthesis |
Avoid using language that stigmatizes the device (e.g., wheelchair-bound). | |
| Body differences | “facial difference” or “limb difference” | Avoid using the term amputee as not everyone with a limb difference has had an amputation. | Preferred general terminology for describing facial difference varies from person to person, but ‘facial difference’ seems to be most widely accepted. |
| Ethnic / cultural signifiers | Clothing and body modifications or adornments that people wear to signify a particular ethnic or cultural identity should be described.
Examples: hijab, kippah/yarmulke, cultural piercings and tattoos |
If you recognize or think that someone is wearing a cultural signifier but you are unsure what it is, check rather than guessing. |
You can find more information about describing skin tone, hairstyle, body size, gender/sex, and assistive devices at the following links:
- Words For Skin Tone / How to Describe Skin Color by Writing With Color (September 2014)
- Are We Food? by K. Imani Tennyson (November 2013)
- Image Description and Identity by Amy Farr Robertson (December 2014)
- The Importance of Language and Communications for Practitioners by AboutFace (November 2022; pdf)
Slurs, Stigmatizing Language and Reclaimed Slurs
Slurs are words that are used to harm people from marginalized communities. They can pose a challenge when writing image descriptions because some slurs are used so casually and commonly that people may not realize that is what they are. Other words may pose a similar challenge because they are used commonly and are not explicitly meant to hurt anyone, but nonetheless reinforce negative beliefs about the communities they refer to.
Slurs can also pose a challenge for image description because some people from marginalized communities may identify themselves using reclaimed slurs—that is, slurs that have been used against them, which they have started using as a way to remove the words’ negative power. If someone uses a reclaimed slur when describing their own image, readers encountering the slur may not realize it is being reclaimed.
For this reason, when someone uses a reclaimed slur in a description of their own image, it may be helpful to add a note that the language used in the description is used deliberately by the subject of the description. It may be useful to include this note within the image description, or elsewhere in the document, before the users encounter the image description.
The following links have more information about common slurs, stigmatizing language, and reclaimed slurs:
- Ableism/Language by Autistic Hoya (Last updated September 2022)
- Guide to Inclusive Language: Race and Ethnicity by the DC Office of Human Rights and the DC Office of Racial Equity (April 2022; archived January 2025)
- The “G” Word Isn’t For You: How “Gypsy” Erases Romani Women by National Organization for Women (October 2017)
- Fat Studies Glossary of Terms by Pratt Institute Libraries (Last updated November 2024)
- Valuing Fatness: A Fat Studies Reading List by Rachel Fox (Spring 2022)
- LGBTQIA+ Slurs and Slang by Chew Inclusive Terminology Glossary (Last updated December 2023)
Describing images of yourself
This section talks about how to write images descriptions for pictures of yourself.
Sometimes, you may be asked to describe a picture of yourself, such as a headshot. When this happens, it is up to you to decide how you want to describe important aspects of your identity and appearance.
Try and describe everything that shows up in the picture and is relevant to who you are. Sometimes, when people are part of a visible majority, they avoid describing that part of themselves. But it’s important to describe it, to move away from treating it as the ‘default’ for how people are.
Below are some suggestions for how to write your image description:
- Describe your hair colour, length and style
- Describe your facial hair, if you have any
- Describe your racial identity and/or skin tone
- If you are white and want to describe your skin tone, avoid using the term “light skin” and instead use words like “pale” or “light pink” or “light beige”
- Describe your gender
- Describe whether you have glasses or other assistive devices that show up in the photo
- Describe your body shape, if it is visible in the photo
- Describe what you are wearing
- Describe your facial expression
- Describe the background in very general terms (e.g., “outdoors”, “plain”, “sunny sky”)
- Use third person
- Don’t begin your description with “photo of…” or “picture of…” – just say what’s in the picture!
Most image descriptions don’t need to be very detailed. They exist to give an idea of the important information that someone would gain from looking at an image.
Below is an example of someone’s headshot and the image description that they wrote for it, which has been provided in the caption.

Figure 3. A white nonbinary person in their thirties, with chin-length, wavy, light blond hair and blue eyes. They are smiling slightly and wearing black eyeglasses and a navy turtleneck sweater. Beside them is an exuberant-looking aloe plant with dark, reddish-brown leaves.
Describing logos
This section talks about how to write image descriptions of logos.
Descriptions of logos should be simple and brief. Describe the shapes and any text that is present. It is not necessary to describe specific colours; however, if multiple colours are used, it may be worthwhile to mention that in the description.
When a logo contains text in multiple languages, provide the meaning of the text in the language of the document and indicate what language is used in the logo.
When a logo is used multiple times within a document, only the first instance should receive a full description. Subsequent instances can be described simply as, “[organization] logo.”
Below is an example of a logo and its full description, which is provided in the caption.
![]()
Figure 4. CIHR logo. A maple leaf with three exuberant people silhouetted against it, above text that says “CIHR Canadian Institutes of Health Research” in English and French.
Describing images of text
This section talks about how to write image descriptions for images that contain mostly text.
Whenever possible, images that are all are mostly text should not be used. Instead, text should be included in the main part of the document. Nonethless, images of text are a popular way to communicate information quickly to audiences. This is especially true on social media, where images are often used to give details about events or research opportunities.
If an image of text is used, the image description should be a direct transcription of the text. Unless they are important for understanding the information being communicated by the image, other visual elements should be treated as decorative and not described. Examples of visual elements that should usually not be described in a text-heavy image are clip-art graphics and speaker headshots.
It can be helpful to describe how text is structured in a text-heavy image. For example, describing when text is part of a heading or a list can make it easier for a screen reader user to understand how the parts of text relate to each other.
One approach to describing the structure of a text in an image is to imagine the image as a Powerpoint slide and write the description like a screen reader announcing the content of that slide.
For some content in a slide, a screen reader will announce the type of element before announcing the content or description of that element. The table below explains how a screen reader would announce some common elements in a slide.
| Element Type | Example Content | Screen Reader Announcement |
| Heading Level [X] | This is the slide title. | Heading Level [X]. This is the slide title. |
| Paragraph | This is the main content of the slide. Normal body paragraphs don’t usually get announced explicitly by screen readers. | This is the main content of the slide. Normal body paragraphs don’t usually get announced explicitly by screen readers. |
| List | · This is the first bullet point.
· This is the second bullet point. · This is the third bullet point. |
List with 3 items. List item 1. This is the first bullet point. List item 2. This is the second bullet point. List item 3. This is the third bullet point. End of list. |
| Image | This is the alt text that has been created for the image. | Image. This is the alt text that has been created for the image. |
| Link | This is a link. | Link. This is a link. |
Below is an example of an image of text and its image description, which has been provided in the caption.

Figure 5. PXP logo. For Patients, By Patients. Heading. 2025 Webinar Series. Webinar 4: Patient Partner Perspectives on Barriers and Facilitators to Patient Engagement in Research. With Alex Haagaard, Francine Buchanan, Linda Niksic and Jim Mann. February 5 2025. 5:30 – 7:00 PM ET.
Describing complex images
This section talks about what complex images are, how they communicate information visually, and how to write long descriptions that communicate the same information using text.
Complex images are types of images that give information about something indirectly, rather than showing the thing directly. This is because they give information about things that can’t be seen directly or all at once. Charts, graphs and diagrams are common types of complex images.
Examples of things that might be represented by complex images are:
- Abstract concepts
- Measurements of biological, chemical or social phenomena
- Natural, social or technological systems
- Changes that happen over time
Complex images use shapes, icons, symbolic imagery and colours to represent the things they are giving information about. They use size and position to represent information about relationships between things, or information about how things change under different conditions. They often use text to give specific details about the information being represented.
Writing long descriptions of complex images
As discussed in Section 2.3.5, a long description is a type of image description that gives a detailed text translation of all the information that someone would be able to get by reading a complex image.
Long descriptions should give information about the following things:
- what is being represented: the overall view and its individual parts
- relationships between things that are being represented, including logical flows between sections
- changing properties of things that are being represented
- boundary conditions, like maximum and minimum values
- most labels and other explanatory text
- symbolism that communicates important meaning
Long descriptions should not give information about visual styling choices, such as specific colours, shapes or icons unless those choices have symbolic meanings that are important to the overall meaning of the image.
Long descriptions of graphs should also not list every axis label for a continuous variable, nor should they list the values of all data points. They should only describe the minimum and maximum value of a continuous variable, the trends shown by the data series, and any noteworthy individual data points.
Describing symbolic content versus symbolic meaning
When describing charts, graphs and diagrams, it is usually best to explicitly describe the meanings and concepts that are being represented. This is because the symbolic choices in this images are usually arbitrary or very abstract.
On the other hand, when describing complex illustrations, it is often best to focus on describing the contents and structure of the image directly, and leave symbolic meaning open to interpretation. This is because the symbolic imagery in illustrations is often used to encourage lateral thinking or critical reflection. The best way to replicate that experience for non-visual users is by describing the symbolic content of the image and letting the user think about what the intended meaning.
You can find more information about describing non-literal images at the following link:
The Disabled List x North York Arts: About Access
Below four examples of complex images with long descriptions. Each figure is a different type of complex image. There is one chart, one graph, one diagram, and one complex illustration. The long descriptions have been provided in the captions for each image.
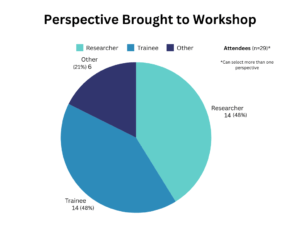
Figure 6. Pie chart titled Perspective Brought to Workshop. There are three segments that represent the following types of attendee perspectives: Researcher, Trainee and Other. The perspectives of 29 workshop attendees are shown. Each attendee could select more than one perspective. 14 attendees (48%) selected Researcher. 14 attendees (48%) selected Trainee. 6 attendees (21%) selected Other.
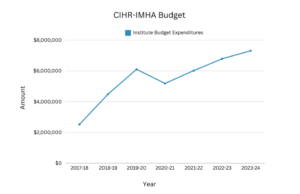
Figure 7. Line graph titled CIHR-IMHA Budget. A single data series shows the amount of institute budget expenditures in dollars for each fiscal year from 2017-2018 through 2023-2024 . Expenditures follow an upward trend from about 2.5 million in 2017-2018 to about 7.5 million in 2023-2024, with a slight dip in expenditures from 2019-2020 to 2020-2021.
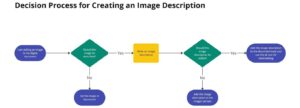
Figure 8. Flow chart titled Decision Process for Creating an Image Description. Step 1, terminal. I am adding an image to my digital document. Step 2, decision point. Should the image be described? Step 2, option A. No. Step 2A, terminal. Set the image to decorative. Step 2, option B. Yes. Step 2B, process. Write an image description. Step 3, decision point. Should the image description be visible? Step 3, option A. No. Step 3A, terminal. Add this image description to the image’s alt text. Step 3, option B. Yes. Step 3B, terminal. Add this image description to the document body and use the alt text for landmarking.

Figure 9. Illustration highlighting key elements of the CIHR-IMHA Inclusive Research Excellence Initiative. Four groups of people appear in different settings, surrounded by oversized versions of tools used in research practices. The people have different skin colours, hairstyles and body shapes. Some are using mobility devices like wheelchairs, canes and forearm crutches. Some are holding children. One person is wearing a lab coat, but most are dressed casually. One person is wearing hijab. The first group stands on or around a magnifying glass, examining charts and tables on a laptop screen. The second group stands and sits in front of a set of stapled papers. They are talking and gesturing while one person writes on a whiteboard. The third group seems to be waiting. They sit and stand in a semi-circle on the pages of an open notebook in front of planet Earth. The fourth group talks with each other while sitting in a circle. There are plants interspersed between the groups, with root systems weaving between them. From left to right: dandelion blossoms, a cedar sprig, a cherry bough, and a patch of goldthread. A block of text lists six domains of research: Indigenous health research, open science, research impact, team science, patient engagement and implementation science. The image is framed by two faint sets of radiating arcs that resemble sound waves or ripples in a pond.
Invitation template for presenters to describe their headshot
This section provides a template that can be used to request image descriptions from presenters along with their headshot. Text that is highlighted in blue should be customized to meet the specifics of what you need.
This template uses identity-first language (“disabled people”), which aligns with the preferences of most disability advocates. Some people prefer person-first language (“people with disabilities”) so you may want to adjust this depending on your audience.
When we share your headshot online, we will include an image description. An image description is a type of access support for people who are unable to see or understand visual content. They can be thought of as a text-based translation of the information that an image communicates.
Image descriptions are important because they are one of the ways we make sure disabled people have the same kind of experience interacting with our website and social media posts as everyone else.
If you feel comfortable doing so, please provide an image description of your headshot. [Suggested length—usually 40-60 words]
https://pxphub.org/guide-describing-images-of-yourself/
If you don’t feel comfortable writing your own image description, please let us know the following details about yourself so that we can make sure to write an accurate description for you. If you would prefer that we don’t mention any of these things, you can let us know that instead.
- Gender
- Race / ethnicity
- Any important features you would like us to mention